Showing posts with label banana. Show all posts

Friday, July 26, 2013

tastes just like magnolia bakery's banana pudding

Magnolia Bakery in NYC is known for their cupcakes, but I'm a REALLY big fan of their banana pudding. Layers of creamy vanilla pudding, fresh bananas, and Nilla wafers that are refrigerated to set overnight. It's so good that I'm finding it hard to describe how good it really is. It's just really good. Dang good. 


iPhone photo courtesy of Betsy McCue of La Vida Creations Photography
I don't know if I can technically call this recipe "from scratch" since 3 out of 5 of the ingredients come from a box or can. Although I have tried to make this from scratch and it was definitely good, but if I can crack open up a can and rip a couple of boxes open to make this heavenly goodness I WILL!!! And you should too because it really is dang good.

I can't take credit for this particular recipe but I'm shouting out a HUGE THANKS to  Confessions Of A Cookbook Queen for sharing it and from what she says it's barely adapted from The Complete Magnolia Bakery Cookbook. Now that I have made this and it's so easy, I hate to say that I may never make it from scratch again. Here it goes.....

Tastes Just Like Magnolia Bakery's Banana Pudding
happily makes 12+ servings or one giant one

INGREDIENTS
1 (16 oz.) can sweetened condensed milk
1-1/2 cups ice cold water
1 small box (3.4 oz.) instant vanilla pudding mix
3 cups heavy whipping cream
Box of Nilla Wafers
4 sliced bananas ***I sliced mine into 1/4" slices but they can be thicker if you prefer your bananas chunky.***

INSTRUCTIONS

In a bowl of either your stand mixer or with a handheld mixer, beat sweetened condensed milk and ice cold water for about a minute. Add the package of instant vanilla pudding and beat for about two more minutes. Transfer to a smaller bowl/container, cover, and refrigerate for at least 4 hours or overnight. The pudding mixture should be extremely firm.

In a large bowl on medium speed, either on your stand mixer, a handheld mixer, (or if you want to burn off some calories before you eat this, whisk by hand), whip the heavy whipping cream until stiff peaks form. Using a rubber spatula, gently fold in the pudding mixture until fully combined and no streaks of pudding are visible. ***I stirred my pudding slightly before folding it into the whipped cream.***

PUTTING IT ALL TOGETHER ***You can make this in a giant bowl or individual servings.***
In a large bowl, layer wafers, bananas, and pudding. Ultimately you want three layers but it will all depend on what size container you decide to use. Cover tightly with plastic wrap and refrigerate for about 8 hours before serving.

***I chose to make mine into individual servings for portion control sake and I DID share them with family and friends since it made 12+ servings. I swear.***

In small glasses or plastic cups, start with a layer of vanilla pudding. To make sure you have even amounts of pudding in each cup, use a 1-1/2 tablespoon cookie scoop or equivalent. Next, drop in a cookie layer. ***I cut up my wafers into quarters.*** I then pushed the wafer pieces down slightly into the pudding before layering my bananas. With your 1/4" slices of bananas, place them directly on top of the cookie pieces. Scoop in a layer of vanilla pudding and spread it evenly so that the bananas are completely covered. This will prevent the bananas from browning quickly. Continue layering until you have at least 3 layers of each component ending with vanilla pudding. Garnish each top of pudding with a half of Nilla wafer. Cover. Refrigerate 8 hours or overnight. 

Monday, April 1, 2013

blind baking a pie crust, banana pudding pie, & post easter celebrations

I have been on a baking & blogging hiatus so I thought I'd pack today's post with more than one recipe. Please forgive me, but I've had other things on my "plate" lately. We're not baking a black-eyed pea pie here but blind baking a pie crust. So here it goes.....


PIE CRUST for one single 9-inch pie crust
1 1/4 cups all-purpose flour
1 tablespoon sugar
1/2 teaspoon table salt
1 stick unsalted butter - cold & cut into 1/2 inch cubes
1/4 cup ice cold water

Drop a couple of ice cubes into your water and set aside.

In a medium bowl whisk together flour, sugar and salt. Add the cold 1/2 inch cubes of butter and cut the butter in with a pastry cutter until the butter pieces resemble small peas. Work fast so that the butter stays cold. Remove the ice cubes from your water and drizzle about half of your water over the flour mixture. With a spatula, work the water around so that the flour mixture gets absorbed. Add the rest of the water and gently work it in. Do not mix. Gently fold.

Dump the mixture out onto a clean surface and gently pinch together the "wet" clumps of dough and set them aside. Sprinkle in a little more water (1/2 - 1 teaspoons) onto the dry bits and gather together. Gently gather the dough together, form it into a ball, press it down slightly into a disk, wrap in plastic and set in the refrigerator for 1 hour (2 hours ideally).

Once the dough has rested and chilled, roll it out onto a lightly floured surface, less than 1/4 inch thick but more than 1/8 in thick. Your crust should be at least 1 inch larger than the pie pan.

Fold the dough into quarters and place the folded point into the middle of the pie pan and gently unfold. Excess dough should be draping over the sides. Fold the excess dough under itself. At this point you could leave it as is, fork the edges down, or with your fingers create a wavy edge.

Prick the bottom of the crust with a fork and place your crust into your frig while you preheat your oven to 425°F. Your crust must be completely cold and firm to prevent the sides from shrinking during baking.

Line your cold crust with parchment paper and pour in some pie weights or dried beans. Make sure your parchment paper reaches well above your crust so that it makes it easy to remove later. Press the parchment and beans so that they reach the sides and corners of the crusts. ***Once you've used your dry beans for blind baking they cannot be used for anything else.***

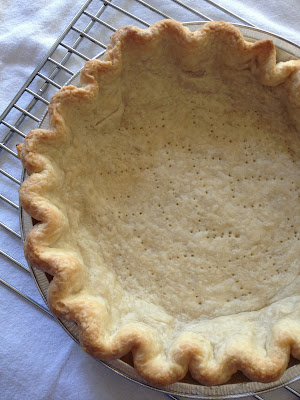
Bake your crust @ 425°F for 20 minutes. Remove your crust from the oven and gently lift out your beans. Lower your oven temperature to 375°F and bake your crust for another 15 minutes or until golden brown.


Set your baked pie crust onto a rack and let it cool completely.

Banana Pudding Pie
adapted from a few recipes....

BANANA PIE PUDDING makes enough for 1 9-inch pie
1/4 cup + 2 tablespoons sugar
3 tablespoons cornstarch
1/4 teaspoon salt
3 large egg yolks
2 cups milk  ***Whole would be best but I used 2% and it was just fine***
1 1/2 tablespoons unsalted butter - cold and cut into cubes
2 teaspoons vanilla extract
3 large bananas - sliced or cut into cubes
1 - 2 tablespoons banana liquor/schnapps (optional) 

1 baked & cooled 9-inch pie crust

In a heavy bottom saucepan, whisk together sugar, cornstarch and salt. In a medium bowl whisk your milk and egg yolks. Add to your sugar mixture and mix thoroughly. Cook over medium heat until it thickens and boils, about 5 minutes, while stirring constantly. Reduce heat to medium-low and continue to cook pudding for 1 minute, still stirring constantly.

Remove from heat and whisk in cold butter cubes and vanilla extract and banana liquor/schnapps if using. Transfer pudding to a shallow bowl and immediately cover with plastic wrap to prevent a skin from forming. Cool for about 30 minutes.

I chose to cut my bananas into 1/2-inch cubes....


I mixed my cubed bananas with 2/3 of the pudding and poured the mixture into my baked and cooled pie crust.


Spread out the chunky banana pudding and pour the remaining third of pudding over the top. Cover with plastic wrap and chill in your frig for at least 2 - 4 hours before serving.


This pie was consumed so fast that I barely got a pic of it!!! If you celebrated Easter, I hope it was a happy one!!!


Wednesday, September 5, 2012

gluten-free tropical banana bread & cup4cup flour

Gluten-free. 
Words that frightened me when I thought about baking.

My fears for baking gluten-free are over now thanks to CUP4CUP's Gluten Free Flour. I stumbled upon it during my daily food blog stalkings on Joy the Baker . This miracle mixture was developed by Lena Kwak, Thomas Keller's Research & Development Chef at The French Laundry. Need I say more??? 

I was oh-so impressed by all the rave reviews this flour received that I rushed out and bought a bag. Or maybe two. And since this GF flour is a special ingredient in my pantry, I will be treating it like baking gold and experimenting with my favorite recipes with caution. 

I have a couple of go-to banana bread recipes, but my ingredients in my pantry were limited so I borrowed ingredients and made substitutions from a couple of recipes from Smitten Kitchen and Musings from a Housewife and concocted my version, a tropical banana bread.

Tropical Banana Bread
makes 1 loaf 

3 ripe bananas 
1/4 cup pineapple - fresh and finely chopped ***Not needed really, but I think it added flavor and moistness.***
1/3 cup coconut oil ***Don't have coconut oil??? Melt some butter.***
3/4 cup coconut palm sugar ***No coconut palm sugar either? Brown sugar would taste awesome!!!*** 
1 large egg, beaten slightly
1 teaspoon vanilla extract
1/4 cup dried unsweetened coconut plus 1 tablespoon for sprinkling on top
1 teaspoon baking soda
1/4 teaspoon kosher salt 

Preheat your oven to 350°F. Lightly oil a loaf pan and dust with flour. Set aside.

With a potato masher or fork, mash up bananas and pineapple. With a spatula, mix in coconut oil to combine. Add coconut palm sugar, egg and vanilla extract then dried coconut. Mix until smooth.  Sprinkle the baking soda and kosher salt over the mixture and mix in. Add your GF flour last and fold in. Pour into your prepared loaf pan. Sprinkle with the reserved 1 tablespoon of dried coconut.


Bake your loaf on the middle rack of your oven for 50-55 minutes or until a tester/skewer comes out clean. 


Cool on a wire rack for 15 minutes and gently remove it from the pan and cool completely.

Sunday, August 5, 2012

whole wheat, peanut butter & banana breakfast cookies

Breakfast to go? Bake up a batch of these whole wheat, peanut butter and banana cookies.....

adapted from A Few Short Cuts
makes 18 cookies

INGREDIENTS
2 bananas - ripe
1/3 cup creamy peanut butter
1/3 cup canola oil ***I used coconut oil***
1 cup brown sugar ***I used a combination of 1/2 cup date sugar and 1/4 cup coconut palm sugar***
1 teaspoon vanilla extract
3 1/4 cups whole rolled oats
1/4 cup all-purpose flour ***I used whole wheat flour. But you can also use a gluten free mix but make sure all of your other ingredients are also gluten free.***
1 teaspoon baking powder
1 teaspoon baking soda
1/2 teaspoon kosher salt

Preheat oven to 350° and line two cookie sheets with parchment paper.

In a bowl, mash bananas and add peanut butter. Mix until combined. Add oil and vanilla. Mix again. Add sugar and mix until until everything is thoroughly combined. In a separate bowl, combine the oats, flour, baking powder, baking soda and salt. Slowly fold the oat mixture into the banana mixture until everything is combined. Using a 2 ounce cookie scoop, scoop mounds of dough onto your prepared cookie sheets, about 2 inches apart. Gently press down your cookies so that they are flattened slightly. Bake for 12 - 15 minutes, rotating your sheets halfway through baking time. Leave on cookie sheets for 5 minutes before transferring them to a cooling rack. 


These breakfast cookies aren't too sweet and have a chewy granola bar texture. 

Try turning them into breakfast thumbprint cookies by adding a little natural jam in their centers. 

Or substitute almond butter for the peanut butter. 

And if you're feeling naughty, add a few chocolate chips.


Individually wrap them in pieces of parchment paper and store them in your freezer. 

Wednesday, August 1, 2012

my favorite breakfast smoothie

I haven't been baking much because it's just too darn hot & humid. Period. Instead, I've been making things to keep us cool and refreshed like aguas frescas and frozen treats. Today I was inspired by my friend Mary who is a writer, fitness nut and a nutritional guru who also happens to have her own blog, Daily Dose Wellness. Like her FB page too because she blogs daily about tons of good stuff! Mary's post today talked about the importance of eating breakfast. Sometimes eating breakfast means eating-on-the-go or sipping on a smoothie. So in honor of Mary, DDW, and her blog post today I'm going to share my favorite breakfast smoothie and I hope she approves.


My favorite breakfast smoothie is similar to the one that is made at my local organic food market. I just can't afford buying one on a regular basis, so I constantly have many of the ingredients on hand so that I can save a few bucks and make my very own.


INGREDIENTS
1 banana  - cut up and frozen is best but not necessary
15 (roughly 1/2 ounce) or more organic raw cacao beans - depending how "chocolatey" you want it 
1/3 cup whole rolled oats 
1 cup unsweetened almond milk - you can substitute soy, rice, oat or regular old milk
2 heaping tablespoons of almond butter
1 - 2 teaspoons of honey - optional
2 ice cubes - if your banana is not frozen

In a blender pulse oats and raw cacao beans until they are almost powdery. Add the almond milk, frozen banana, almond butter, honey and ice cubes and blend. 


Organic Raw Cacao Beans can been a little pricey but are worth every bean. I love adding them to my smoothies because you get a chocolately taste and a good hit of pure energy. Cacao beans are also groovy because they contain a natural rich supply of antioxidants and are an excellent source of dietary fiber. Blend them with a frozen banana, a handful of oats, almond butter and almond milk and you'll have breakfast to go..... 

Thursday, July 26, 2012

chocolate & salted peanut covered frozen bananas

Bananas, dark chocolate, and salted peanuts. What's not to love???


INGREDIENTS
bananas ***Not-too-ripe bananas work best here but if your bananas have a few brown spots on them it's gonna be totally fine.***
chocolate - finely chopped ***I prefer using 70% or more dark chocolate.***
roasted peanuts - roughly chopped ***Salted ones taste best, but if you're trying to cut back on your sodium intake, just make sure your peanuts are roasted for the best flavor.***
honey (optional) ***Dark chocolate is not as sweet as milk or semi-sweet so I add just a little honey for added sweetness and flavor.***
sticks - lollipop or popsicle sticks ***If you don't have any sticks, the next time you're grabbing a cup-o-joe, just snag a few wooden coffee stirrers.***


There are no exact measurements here. Eye ball the amount of chocolate you'll need for the amount of bananas you're using. I melted roughly 1/2 cup of chocolate for one and a half bananas/3 halves. I also added 1 teaspoon of honey for additional sweetness into my melted chocolate. Peanuts??? A handful? 


Peel your bananas, cut them in half, and insert a stick on the cut side. Place on a parchment lined sheet pan and freeze your bananas until frozen. ***I froze mine over night.***


In a heat proof bowl, microwave your chopped chocolate for 30 seconds. Stir. The chocolate will almost be completely melted after 30 seconds. This is optional, but I add a little honey to my chocolate. Nuke for 10 seconds. Stir to combine and set aside with your peanuts.

Pour your melted chocolate into a small glass with a narrow opening so that you can dunk your banana in it. 


Chop your peanuts. ***I like mine roughly chopped.*** Allergic to peanuts??? Substitute toasted chopped walnuts or almonds. Rainbow sprinkles would be awesome too!!!


Dunk your frozen banana into your chocolate, give it a spin and a twirl and roll it into your chopped peanuts.


Place your peanut and chocolate covered bananas back onto your parchment lined sheet and place back into your freezer until the chocolate is set.

Sunday, October 30, 2011

chunky monkey bread

Yesterday the weather in the North East took a serious winter dive and it snowed in October. SNOWED IN OCTOBER!!!!! We've been living in NY for over 10 years and this is the EARLIEST that I/we have ever experienced snow before Halloween. C'mon??? Are you kidding me??? 


For most cold, rainy & snowy days go hand in hand with baking.....For me??? I could bake in the middle of summer and 100 degrees outside. I bake when I want to and that's usually ALL THE TIME!!! Yesterday's weather called for bread baking and I was in a hurry so I mixed up my version of "chunky monkey bread". This quick bread's flavor profile is similar to Ben & Jerry's Chunky Monkey Ice Cream - banana, chocolate, walnuts.....Need I say more???


Chunky Monkey Bread
adapted from myrecipes.com


2 cups all-purpose flour
3/4 teaspoon baking soda
1/2 teaspoon kosher salt
3/4 cup sugar
1/4 cup unsalted butter, softened
1 1/2 cups banana, mashed (about 3 bananas)
2 large eggs @ room temp
1 teaspoon vanilla extract
1/3 cup plain/banana/vanilla flavored yogurt or sour cream or buttermilk
1/2 cup bittersweet chocolate - chips or finely chopped 
1/2 cup walnuts, toasted and roughly chopped


Preheat oven to 350˚F. Spray or butter a 8 1/2 x 4 1/2 loaf pan or comparable size. Spread walnuts onto a baking sheet and toast until fragrant or approximately 10 minutes. Set aside to cool and roughly chop.


In a medium sized bowl, whisk together flour, baking soda and salt. Set aside.


In a small microwave safe bowl, melt chocolate in 20-30 second increments until completely melted. Set aside to cool slightly.


In a large bowl and with a hand held mixer or with a wooden spoon, cream butter and sugar (this will appear grainy and not completely creamed). Add eggs one at a time until thoroughly combined. Add yogurt/sour cream/buttermilk, mashed banana and vanilla. Mix to combine. Add in flour mixture and fold with wooden spoon or mix on low until moist. Do not over mix. Gently combine 1 cup of banana batter with the melted chocolate. Fold in the toasted walnuts with the banana batter.


Alternate spooning batter into prepared pan. With a paring knife or skewer swirl together. Bake for 1 hour 15 minutes or until cake tester/skewer comes out clean.


Cool for 10 minutes before removing it from the pan. Cool bread completely on wire rack.


***Don't be afraid to toast this up in the morning and smear it with a little peanut butter, butter, cream cheese or my new favorite yogurt butter by Brummel & Brown. The bread baking doesn't end here.....more to come!!!***

Tuesday, August 16, 2011

recipe testing #3 - whole wheat banana bread

There are quite a few banana bread recipes out there and I do have my personal favorites. Today's recipe, whole wheat banana bread, is so good that I'll just have to add this one to my faves.


I've been on a "natural" sugar high these days and I am just stoked when I bake a recipe and it actually tastes good. Not saw-dusty at all!!! It's a huge adjustment for your palette to go from eating things made with processed white sugar vs. whole and natural sweeteners. Although when you eat something whole and natural, it just seems right. 


I guess I'll just have to save cupcakes with butter cream frosting, chocolate chip cookies, brownies and everything else that I adore for just special occasions......


Whole Wheat Banana Bread
found on allrecipes.com 


1/3 cup vegetable oil ***I substituted coconut oil here***
1/2 cup honey
1 teaspoon vanilla extract
2 eggs
1 cup mashed bananas
1 3/4 cups whole wheat flour
1/2 teaspoon salt
1 teaspoon baking soda
1/4 cup hot water
1/2 cup walnuts (optional)


1. Preheat oven to 325F.


2. In a large bowl, beat oil and honey together. Add eggs and mix well. Stir in bananas and vanilla extract. Stir in flour and salt. Add baking soda to hot water, stir to mix, and then add to batter. Fold in chopped nuts. Spread batter into a greased 9x5 inch loaf pan.


3. Bake for 55 to 60 minutes. Cool on wire rack for 1/2 hour before slicing.