Showing posts with label raspberry. Show all posts

Tuesday, February 14, 2012

raspberry zinger cupcakes & happy valentine's day!!!

Almost one year ago I blogged about raspberry zinger cupcakes. I didn't include any real recipes or techniques. I gave a small and lame description and I attached a little photo. But for some weird reason, this was and still is THE most popular post!!! 
I guess everybody loves Zingers.....


I hope the second posting of this "recipe" gets as many hits as the original post. I tried to photograph every single step so that anyone and everyone could follow. The creamy white filling still seems like a mystery to me, but I borrowed a recipe for the filling from another blog for today. After I sampled my zinger cupcakes, I think plain old marshmallow Fluff will do just fine.....


Classic White Cake
Makes 24 regular-sized cupcakes OR half the recipe and make 12
This recipe was given to me by one of my pastry chef instructors from The French Culinary Institute. It was a xerox copy of a page from either a book or magazine. Unfortunately it didn't have any names attached so that I cannot give credit to where it is due.


1 cup milk - at room temperature
3/4 cup egg whites (about 6 large or 5 extra large) - at room temperature
2 teaspoons almond extract
1 teaspoon vanilla extract
***If you don't have almond extract, you can just substitute it for more vanilla extract***
2 1/4 cups plain cake flour (NOT self-rising)
1 3/4 cups sugar
4 teaspoons baking powder
1 teaspoon salt
12 tablespoons unsalted butter - at room temperature


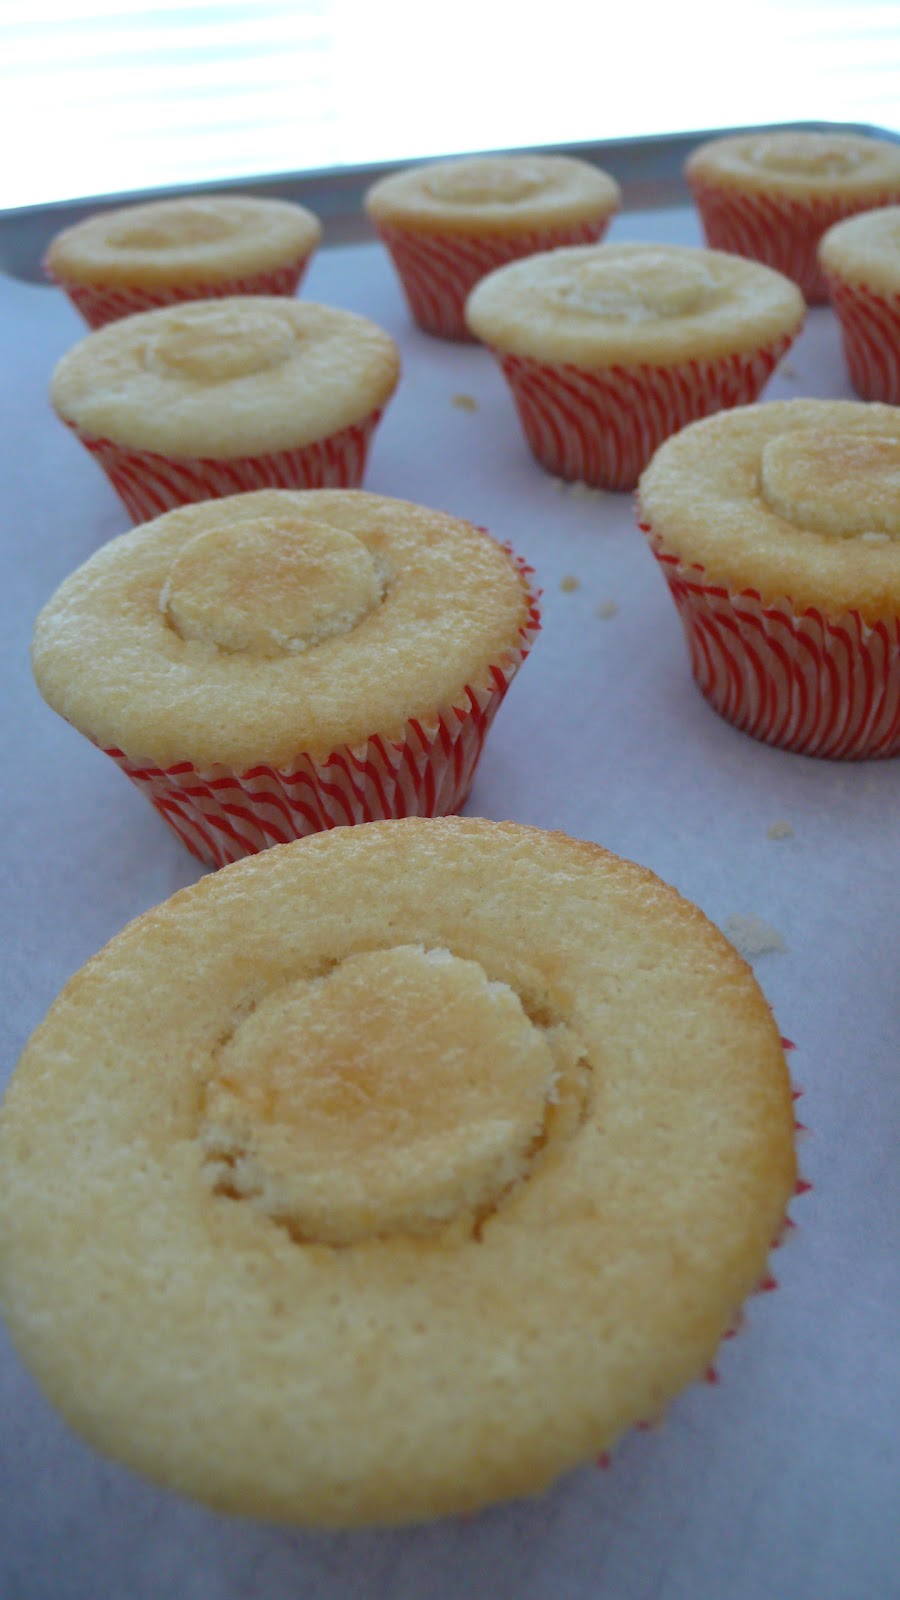
Heat oven to 350˚F. Line a cupcake/muffin tin with paper liners. Set aside.


Pour milk, egg whites, and extracts into a measuring cup and mix with a fork until blended.


Mix cake flour, sugar, baking powder, and salt in a bowl of an electric mixer at low speed. Add butter; continue beating at low speed until the mixture resembles moist crumbs, with no powdery ingredients remaining.


Add all but 1/2 cup of milk mixture to crumbs and beat at medium speed (or high if using a handheld mixer) for 1 1/2 minutes. Add remaining 1/2 cup milk mixture and beat for 30 seconds more. Stop mixer and scrape down sides of bowl. Return mixer to medium (or high) speed and beat for 20 seconds longer.


Divide batter evenly in your cupcake liners. ***I use a 2 ounce scoop.***


Bake on the middle rack for 20 - 25 minutes or until toothpick inserted in the middle comes out clean. Rotate pan for even baking and browning. Cool completely on wire rack.


Creamy White Filling
Makes enough to fill 24 cupcakes


6 tablespoons unsalted butter, softened
1 1/2 cups confectioners' sugar
3/4 cup marshmallow Fluff
1 1/2 tablespoon heavy cream


In a medium bowl beat together the butter and marshmallow Fluff. Add confectioners' sugar and heavy cream. Mix slowly until combined then beat until fluffy. 


***In a pinch, you can use the marshmallow Fluff straight from the jar.***


Transfer mixture into a Ziplock bag or pastry bag fitted with a 1/2-inch round tip.
In the meantime, with a 1-inch round cutter, cut the middles out of the cooled cupcakes. 


Since you will be filling these, cut a little off of the bottom of each cupcake "middles".


Set the cupcakes and "middles" aside while you strain the seeds from the raspberry jam.


In a strainer over a small bowl, with a small spatula, gently press the 1/2 cup raspberry jam through the strainer to remove the seeds. Set aside.


Cut a small hole off of the tip of your Ziplock bag or insert the tip of your pastry bag into the hole of each cupcake and slightly squeeze in some filling.  


Fill about 3/4 full.


Place the reserved cupcake "middles" on top of the filling and press down slightly. Refrigerate to set for 5 minutes.


Get a small offset spatula or butter knife, your strained raspberry jam and in a small shallow dish 1/2 cup unsweetened coconut ready.


Spread a thin layer of jam over the tops of each cupcake.


Then carefully dredge each one in unsweetened coconut.


HAPPY VALENTINE'S DAY!!!

Wednesday, February 1, 2012

toasted almond scones

It's February 1st and it feels strangely like spring is in the air. The norm would be freezing cold and snowy, but today's forecast is a crazy high of 60˚F and a chance of a shower.


I'm meeting up with some of my bestest girlfriends this morning for a play date with their kids. I of course will be flying solo but will have toasted almond scones in tow.....


These scones have a quadruple threat of almond in them: ground toasted almonds, chopped toasted almonds, almond extract and sliced almonds sprinkled on top. I spooned raspberry jam in the middle of half of them because I just love a combo with almond and raspberry.


Toasted Almond Scones
taken from the app Baking with Dorie
Makes 12 scones


INGREDIENTS
1 cup blanched toasted almonds (whole, slivered, or sliced)
2 tablespoons of sugar
1 large egg
1/3 cup heavy cream
1/4 cup milk
1/8 teaspoon almond extract
1 3/4 cup all-purpose flour
1 tablespoon baking powder (double-acting)
1/4 teaspoon salt
1 stick of unsalted butter (chilled and cut into small pieces)
1/4 cup sliced almonds (optional)
2 - 4 tablespoons of raspberry jam (optional)


Center a rack in the oven and preheat the oven to 400˚F.


Line a baking sheet with parchment paper or a silicone baking mat.


Divide the toasted almonds in half. Finely grind 1/2 cup in a food processor or blender with a generous pinch of sugar, taking care not to over grind the nuts and end up with almond butter. Finely chop the other 1/2 cup.


Whisk the flour, ground almonds, remaining sugar, chopped almonds, baking powder, and salt in a large bowl. Set aside. ***Or pulse a couple of times in your food processor***


Stir together egg, heavy cream, milk, and almond extract. Set aside.


Drop the 1 stick of butter into your flour mixture and using your fingers, toss to coat the pieces of butter with flour. ***Since my food processor was already being used, I dumped my flour mixture back in and then I dropped my butter cubes right on top*** Quickly, working with your fingertips or a pastry blender, cut and rub the butter into the dry ingredients until the mixture is pebbly. ***Or if using your food processor, give the butter and flour mixture a few pulses. There should be big and little "pebbles" of butter throughout*** 


Pour the liquid ingredients over the dry ingredients and stir with a fork just until the dough., which will be wet and sticky, comes together. ***I poured my wet ingredients over the dry ingredients and pulsed a few times until the dough came together slightly. Be careful not to over process***


Still in bowl, gently knead the dough by hand or turn it with a rubber spatula 8 to 10 times. ***I lightly floured my surface, turned the dough out, and gently gathered it together***


Turn the dough out onto a lightly floured work surface and divide in half. Working with one piece at a time, pat the dough into a rough circle that's about 5 inches in diameter, cut into 6 wedges and top each scone with a few sliced almonds, if you're using them. (At this point, the scones can be frozen on the baking sheet, then wrapped airtight. Don't defrost before baking - just add 2 minutes to the baking time.)


***If you want to add raspberry jam to them, gently press your thumb into the middle of each scone and spoon a heaping teaspoon into the indentation. You can also sprinkle with sliced almonds too!***


Place the scones on to your prepared baking sheet and bake for 20 - 22 minutes or until their tops are golden brown. Transfer the scones to a wire rack and cool to room temperature. 

Friday, December 30, 2011

peanut butter-n-jelly bars and a happy new year!!!

It's New Year's Eve Eve and it's time to bust out your resolutions. A lot of people have dieting on their lists, but before you start your New Year's diet, go into your kitchen and make these. Now! 

When I was tasting them earlier I was kinda convincing myself that these would be a great breakfast item. Yeah, right?! These peanut butter-n-jelly bars are just wrong.....but in a good way.

Peanut Butter-n-Jelly Bars
2001 Holiday Cookie Issue by Martha Stewart

Makes about 3 dozen

1/2 pound (2 sticks) unsalted butter @ room temperature, plus more for pan
1 1/2 cups sugar
2 1/2 cups smooth peanut butter ***Other recipes called for Skippy, but I went with a natural and organic peanut butter***
1 teaspoon vanilla extract
2 large eggs @ room temperature
3 cups all-purpose flour, plus more for pan
1 1/2 teaspoons table salt ***I used kosher salt***
1 teaspoon baking powder

1 1/2 cups strawberry jam ***I like raspberry***
1 cup salted peanuts, roughly chopped 

1. Preheat oven to 350˚F. Butter a 9-by-13-inch baking pan, and line the bottom with parchment paper. Butter the parchment paper, dust with flour, and tap out the excess; set aside. Place butter and sugar in the bowl of an electric mixer fitted with paddle attachment. Beat on medium speed until fluffy, about 2 minutes. Add peanut butter and vanilla and mix to combine. Add eggs one at a time; incorporating each egg until it's creamy and a homogeneous mixture, about 2 minutes.


2. Whisk together flour, salt and baking powder. Add to the butter mixture, and beat on low speed until combined. Transfer two-thirds of the mixture to your prepared pan. Press down dough evenly with your fingers or an offset spatula. Using your offset spatula, spread 1 cup of jam on top peanut butter mixture. With the remaining third of dough, drop small clumps/dollops of peanut butter dough on top of jam. Sometimes the jam is completely covered by the third of the peanut butter dough. Not to worry, here is where you would dollop the remainder 1/2 cup of jam in tablespoons on top of the peanut butter clumps. Sprinkle with chopped salted peanuts.


3. Bake until golden, 45 to 60 minutes, rotating halfway through. Transfer to a wire rack to cool. Run a knife around the edges and refrigerate, 1 to 2 hours. Cut into about thirty-six 1 1/2-by-2-inch pieces.


For Chris, Sarah, Eddie & Marilyn.....Happy New Year!!!