Wednesday, October 31, 2012

vacation, post hurricane sandy and dough & batter branding

It's Halloween and post hurricane Sandy. I am feeling sad for so many of our friends, fellow NYers and beyond who have experienced the worst the past couple of days. I only wish that I could offer them something - anything!!! I have lived unscathed through 9/11, the blackout of 2003, last year's hurricane Irene and now Sandy. New Yorkers are strong and even friendly and will pull together to bring this city back into shape - eventually.....

92nd Street, Rockaway Beach, NY
photo courtesy of Lauren O'Conner via Sarah Romulo's FB page 
There are many fake pics out there and in case you are wondering, this pic is the real deal!!! Unfortunately part of the boardwalk has swept up onto the street and on the doorstep of my friend's house. Please send happy and positive thoughts. A LOT of people need them!!!


Forgive me for the lack of blogging because I was on vacation the past 2 1/2 weeks. We were visiting family, picking/juicing/eating apples off of the trees, drinking wine by the fire and eating farm-to-table. Sounds heavenly, right??? Kinda wish we were still there.....

My husband and I were lucky enough to catch an earlier flight back on Sunday before Sandy immobilized the east coast. Our local grocery store is completely out of anything "bread" and I am baking my third loaf as I type this. If anyone is interested in a loaf of bread, hit me up! I'm baking up a storm. (no pun intended)


On a happier note and while I was away, my logo and incredibly talented branding designer, Hyun Auh, was featured on a local design blog!!! Hyun has been featured before on other blogs and publications but Jamie from 128 john st. combined together Auh Design and DOUGH&BATTER. 128 john st. IS about design and cupcakes. No wonder we both made the post. 

Tuesday, October 16, 2012

morning buns

Morning buns.
Yeah, you know you want one!!!

These morning buns look super intimidating to make, but they're not. You've just got to have a little patience.....

As most of you know, I geek out on what I call food porn. I watch A LOT of food related tv - educational and reality. If it's about food, I'm watchin' it!

I came across a Cook's Country episode on PBS on a lazy Sunday afternoon for breakfast yummies. And when I saw it was about morning buns, I set Tivo to record it so I didn't miss a thing. 

The pastry or dough part of these buns are a form of laminate dough. For all my fellow pastry chefs, you know what I'm talkin' about, but for the home baker it's pastry dough that is prepared by layering dough and fat along with a long process of rolling and folding. I know that sounds like a mouthful, but this recipe is far from scary so don't be intimidated.

Morning Buns 
scribbled down from an episode of Cook's Country on PBS
makes 12 and sadly only 12

DOUGH
3 cups all-purpose flour
1 tablespoon sugar
1 envelope (2 1/4 teaspoon) rapid rise or instant yeast ***There are several different types of yeast so it's important that the right one is used in this recipe.***
3/4 teaspoon salt
24 tablespoons (3 sticks) unsalted butter - cut into 1/4 inch slices and chilled
1 cup sour cream - cold
1/4 cup orange juice - cold
3 tablespoons ice water
1 large egg yolk

FILLING
1/2 cup sugar
1/2 cup firmly packed light brown sugar
1 tablespoon freshly grated orange zest from a large orange
2 teaspoons ground cinnamon
1/4 teaspoon of salt
1 teaspoon vanilla extract

Before you do anything, zest your orange and measure out your juice and zest needed and set aside.

For the DOUGH:
Combine flour, sugar, yeast and salt into a large ziplock bag. Add the slices of butter to the bag, zip it shut and shake to coat butter slices with flour mixture. Once the butter slices have been coated, open the bag a little and press out all of the air and tightly zip it shut again. Lay your bag of butter and flour on a flat surface and with a rolling pin, roll over bag several times, shaking and moving butter pieces around until all of the butter seems to be pressed into large flakes after rolling. Dump the contents of the bag into a large bowl and stir in the sour cream, orange juice, water and egg yolk until combined.

Turn your dough out onto a lightly floured surface and gather it together and knead it briefly into a smooth ball. Lightly flour your surface again and roll your dough out into a 20 x 12 inch rectangle. Starting with the shorter end, roll the dough into a tight cylinder. Gently press the cylinder flat into a 12 x 4 inch rectangle. Place rectangle onto a parchment lined baking sheet, cover with plastic wrap and chill in your freezer for 15 minutes.

Line a muffin tin with foil liners. Do not use paper liners because your buns will stick to the paper!!! Spray your liners with baking spray and set aside.

For the FILLING:
In a bowl, mix together sugar, brown sugar, orange zest, cinnamon, salt and vanilla extract.

DIRECTIONS:
Remove your dough from the freezer and on a lightly floured surface, roll the dough out into a 20 x 12 inch rectangle. Sprinkle the filling over your dough leaving a 1/2 inch border on all sides. Starting on the longest end, fold over about 1 1/2 inches of dough and the start rolling in into a tight cylinder. Pinch the end to seal the seam. 

With a sharp knife, cut the cylinder in half. 

***The show suggested to cut a half inch off of the edges, but why waste any of it?*** 

Cut the halves in half and then cut into thirds creating 12 equal portions. 


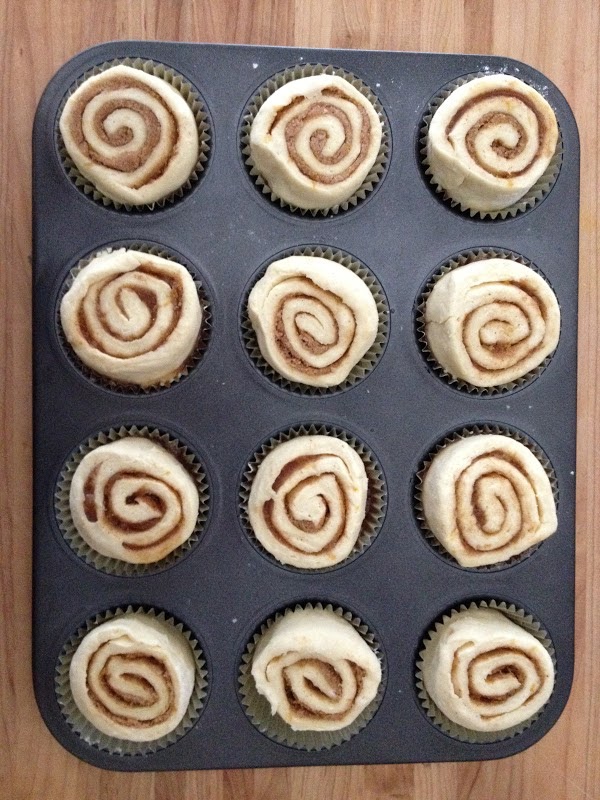
Gently place your buns into your prepared foil 
liners.


Loosely cover with plastic wrap, place into the refrigerator and say good-bye to them for at least 4 hours and up to 24. 

***I prefer to let them rest overnight. I know, it's torture!!!***


Adjust your oven rack to the middle position. Bring a pot of about 4 inches of water to a full boil. Remove your chilled buns from the refrigerator, place on the middle rack of your oven and set the pot of hot water on the bottom of the oven. Close the oven door and let the buns proof for 20 - 30 minutes, until doubled in size.

Remove the buns from the oven and preheat your oven to 425°F. 


Bake the buns for 5 minutes and reduce the temperature to 325° and continue to bake until deep golden brown, 35 - 45 minutes. 


Cool your buns in the tins for 5 minutes. Carefully transfer to a wire rack and immediately remove the foil liners. 

Serve warm.


Friday, October 12, 2012

dough & batter's etsy shop

My new DOUGH & BATTER Etsy shop is open for business!!! 
Check it out.
"Like" my shop.
And place an order!


http://www.etsy.com/shop/doughandbatter?ref=search_shop_redirect

Thursday, October 11, 2012

7 layer bars

Graham crackers, butter, sweetened condensed milk, walnuts, coconut, chocolate chips, white chocolate chips, butterscotch chips and kosher salt. Does that make these 9 layer bars??? There are many versions of this recipe, but I liked the chip combo from the Brown Eyed Baker. I altered some of the ingredients to my personal taste and used what I had in my pantry.....

INGREDIENTS
9 graham crackers - you'll get 3 packages in a box of grahams. One package is 9 crackers.
1 stick (8 tablespoons) unsalted butter - melted ***I cut 3 tablespoons out of the original recipe. I know it doesn't sound like much, but I was trying to cut back on our butter consumption a little. Due to the minimal butter used, my bars also crumbled as we ate them, but we didn't really care? They were still tasty***
1 can (14 oz.) sweetened condensed milk ***I used about 9 oz. or 3/4 of the can because that's what I had available.***
1 cup walnuts - finely chopped
1 cup sweetened flaked coconut 
1 cup bittersweet chocolate chips ***You could use semi-sweet, but I personally like the taste of bittersweet.***
1/3 cup white chocolate chips
1/3 cup butterscotch chips
3/4 teaspoon kosher salt 

Spray lightly with cooking spray a 9x13 inch pan and line with 2 sheets of parchment paper - overlapping bottom and going up the sides. Leave the wider sides a little long so that it acts as handles when you want to remove the bars from the pan. Preheat oven to 350°F. When your oven is ready, toast coconut. Don't walk away, the coconut toasts/browns pretty quickly. 4 - 5 minutes. Toss during baking to ensure even browning.


In the meantime, dump your graham crackers into a gallon ziplock bag. Press out all of the air and with a rolling pin bash and roll them into fine crumbs. 

In a bowl, mix together thoroughly the graham cracker crumbs, 1/2 teaspoon kosher salt and melted butter. Firmly press mixture into the bottom of your prepared pan.


Scatter the chopped walnuts onto graham cracker crust, then assorted chips and next the toasted coconut. In an even stream, pour the sweetened condensed milk over the entire pan of goodness. Generously sprinkle the remaining 1/4 teaspoon of kosher salt on top. 


Bake until golden brown for 25 - 30 minutes. 

Cool bars in the pan for at least 2 hours.

With the parchment handles, gently remove from pan and cut into bars.


Saturday, October 6, 2012

a little louis for leah's birthday

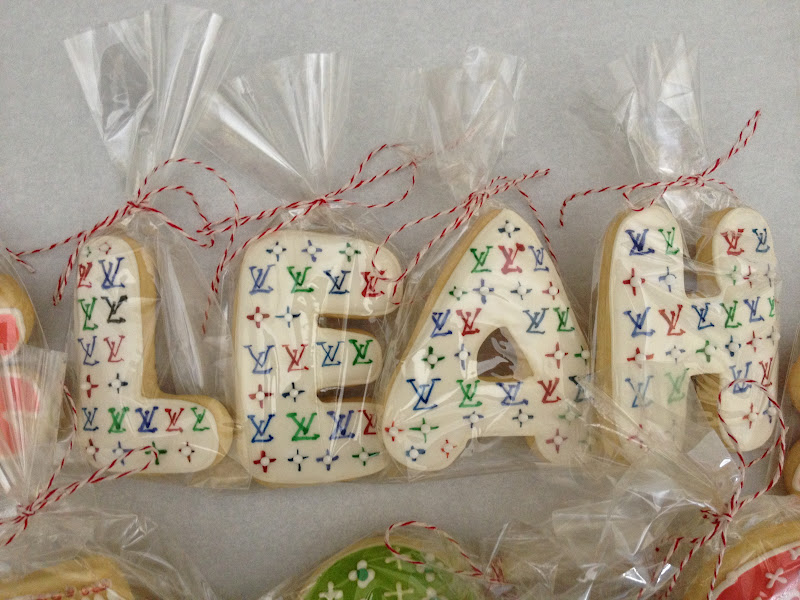
It's my cousin's birthday and when I heard she loved Louis Vuitton I was nervous and excited at the same time. The nerves kicked in as I began hand painting the LV pattern.....


I was excited to create some Murakami.....


My interpretation of the LV pattern.....


Now I know the pattern isn't picture perfect, but you get the idea. Right???


Happy Birthday Leah!!!

Friday, October 5, 2012

minnie mouse bow-tique cookies for addison

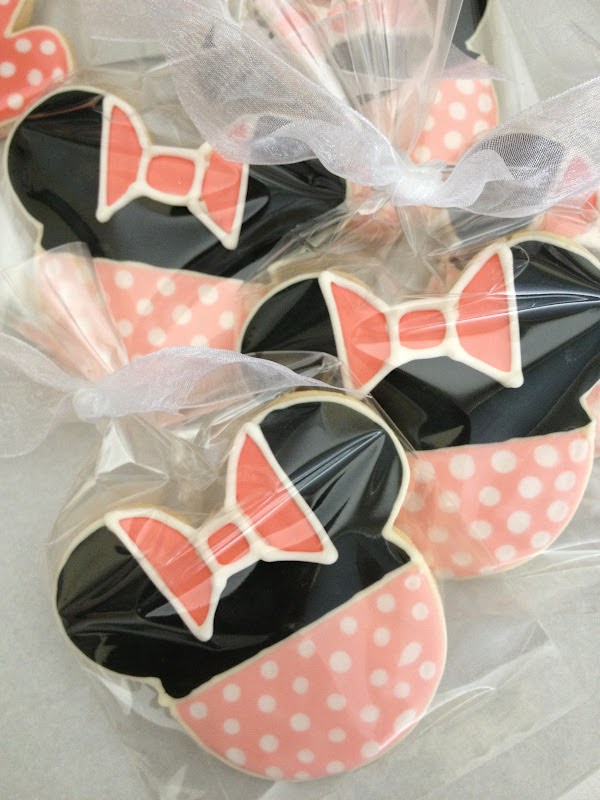
A couple of years ago I was commissioned by La Vida Creations Photography to design and create cookies to give to past, present & future clients, friends & family, fellow photographers, wedding vendors, event coordinators and industry peeps. Luckily one of La Vida Creation's cookie recipients remembered me and my cookies and placed an order for their daughter Addsion who is turning 2 tomorrow!!! The theme for the party is Minnie Mouse's Bow-tique..... 


I still don't own a "mouse" cookie cutter, but a couple of different sized circle cutters and a little royal icing formed Minnie (or Mickey) just perfectly.


You gotta have a big pink polka dot bow.....


And number 2s.....


You're 2 !!!!!

Happy Birthday Addison!!!

Saturday, September 29, 2012

super hero cupcake toppers for charlie's 3rd birthday

I usually like to make my cupcake toppers out of gum paste. Like I did here, herehere and here. But when it comes to making cupcake toppers for toddlers I'm switching it up and piping them out of royal icing. Because when you're a little kid, you want to eat everything off of your cupcake!!! That includes the decoration!!! 

***Gum paste is totally edible too, but gum paste dries quite hard and honestly not the best tasting stuff.***

My first attempt at making royal icing cupcake toppers was for Jasper's Cars themed birthday. And since I felt it was pretty successful I decided to use the same technique for Charlie's Super Hero birthday party this weekend. 

So let's get piping.

What you'll need:
1 batch of your favorite royal icing
gel food coloring
sheets of parchment paper
clean sheet pans
plastic piping bags fitted with a tip with a small piping hole/opening
OR parchment paper triangles rolled into cones 
small binder clip
toothpicks
a piece of thin cardboard for cutting out a stencil
a Sharpie

Before you get started, tint the shades needed for your royal icing. Be careful not to add to much water in the beginning because you want your royal icing to be quite stiff to pipe out the flood lines. Pretend you're about to decorate invisible cookies. 


For Superman: Figure out how large you want the "S" to be and using the thin cardboard, cut out a stencil. Take a large piece of parchment paper and fold it in half. Open up the parchment and on the inside of the parchment paper trace the stencil with your Sharpie marker.

Fold over the top part of the parchment paper so you're ready for piping. Place folded parchment onto a clean sheet pan.

***You don't want to pipe directly onto your outline because (A) it's ink from a Sharpie and (B) because it's just yucky.*** 
Fill your piping bag or parchment paper cone with red royal icing and fold over the top so that the royal icing doesn't ooze out.

Since you've used a Sharpie tracing out your outline, you'll be able to see it through the paper. Begin piping out all of the outlines and set aside to dry. 


Once your outline is dry, fill it with your yellow tinted icing. You might need to add a little water to your icing so that it resembles a thick heavy cream.


After the icing has dried for a couple of hours, carefully pipe the red "S" on top.

Set aside to dry completely.


For Batman: Batman's symbol was a little difficult to cut out a cardboard stencil, trace and pipe so I decided just to free pipe the design with black royal icing on parchment on a clean sheet pan.


Pipe out the outline.
Let it dry completely.
Fill with black icing.

***The toothpick helps you guide the royal icing into the crevices.***

The bat is pretty delicate. I'd recommend piping over the entire design again after it has dried for a couple of hours.

Set aside and let dry completely.


***These WERE pretty delicate and I got scared that they would break during transit because I was handing over the toppers and cupcakes separately. I went ahead and cut out bats out of gum paste just in case.....*** 
The Green Lantern's symbol was pretty easy. No need for a stencil or tracing. Just free pipe. Let dry and fill in the center with white royal icing.
For Spiderman: Follow the Superman steps for making a stencil and tracing out Spiderman's face onto the inside of a folded piece of parchment. This will ensure that they're all the same size. 

Pipe out flood line with red royal icing.
Fill with red icing.
And with a toothpick, draw icing to the edges.


While the icing is still wet, pipe 3 black icing circles into the red icing.


To make the spider-like web for Spiderman's face, take your toothpick and draw through the lines starting from outside of the largest circle and then from the inside circle; drawing inwards then outwards.


You may want to wipe off the toothpick in between drawing through the icing so that the colors don't get muddled.

Let this dry completely. At least 2 hours or more.

Pipe out a long teardrop for Spiderman's eyes. Let this dry completely. About an hour.

Fill the eyes in with white royal icing. Without disturbing Spiderman's face, with your toothpick carefully drag white icing to fill in the crevices. 

Let dry completely, 2 or more hours.

To define Spiderman's eyes, I repiped the outline with black royal icing.

Let your icing toppers dry completely overnight.  


Royal icing cupcake toppers are very delicate compared to gum paste toppers. Once dried completely (preferably overnight) they can be stored in an airtight container for future use or used right away. 


These Super Hero cupcake toppers were created for Charlie's 3rd birthday this weekend. And since I do not know what happens to the toppers once refrigerated I had to hand over the cupcakes and toppers separately.....No pics. Sorry!!!

You're 3 !!!

Happy Birthday Charlie!!!