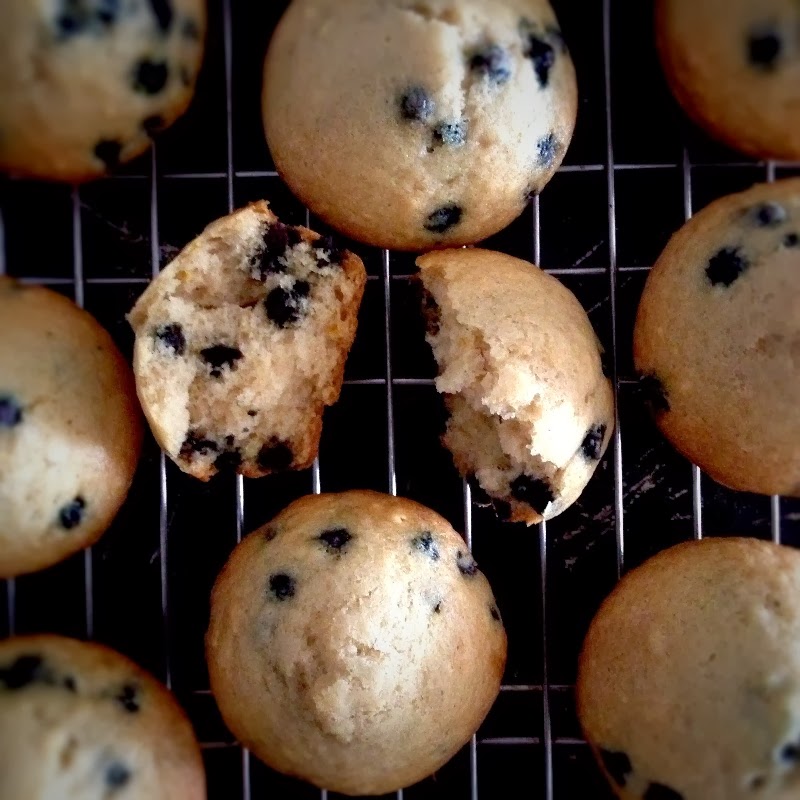
I'm officially on Christmas holiday abroad and on hiatus from my vegan diet. This will also be my last post for 2013 and thank you all for following me!!! So for the next two weeks I'll be consuming all dairy products in moderation, but I'll end this year with delicious vegan chocolate chunk with almond cookies.
The first time I made these vegan cookies by Baker Bettie I followed the exact recipe. The second time I made them I added my own twists and I have to admit that these are pretty darn good vegan cookies. The recipe only makes a dozen cookies, it's quick and easy and when you're jonesing for cookies, this recipe is for you! Vegan or not, make these cookies!!!
Vegan Chocolate Chunk w/ Almond Cookies
adapted from Baker Bettie's blog
makes 12 cookies
INGREDIENTS
1/4 cup vegan butter ***I used Earth Balance.***
1/4 cup vegetable shortening ***You can use vegan butter here also.***
3/4 cup dark brown sugar ***Baker Bettie uses dark muscovado sugar here but use whatever sugar you have in your pantry. Preferably light or dark brown sugar.***
1 teaspoon cornstarch
1/2 teaspoon baking powder
3 tablespoons soy milk ***Plain old water is OK too.***
1 teaspoon vanilla extract
1 cup + 4 tablespoons of all-purpose flour
1/4 teaspoon kosher salt plus a little more for sprinkling on top of cookies
1 cup vegan chocolate chips/chunks ***The only vegan chocolate I had on hand was a one pound bar of Trader Joe's Dark Chocolate w/ Almonds. I chopped it up and added it to my recipe and it tasted great!!!***
Preheat your oven to 375ºF. Line two cookie sheets with parchment paper and set aside.
In your bowl of your stand mixer, fitted with a paddle attachment, whip vegan butter and veg shortening with dark brown sugar until it's doubled in volume and light and fluffy. Roughly about 3 - 5 minutes on medium-high speed. Scrape down the sides of your mixing bowl.
In a small bowl, whisk/mix together cornstarch, baking powder and soy milk. Add to butter and sugar mixture along with the vanilla. Mix until thoroughly combined. Scrape down sides again.
With the mixer on low speed, gradually add the flour and kosher salt. Do not over mix and stop the mixer at the point to almost all of the flour is mixed in. Add the chunks and mix for a few seconds. ***If there is still flour visible, gently fold mixture by hand with a large spatula.***
With a cookie scoop (I think mine is a 2 ounce scoop) evenly scoop out 12 cookies onto your prepared cookie sheets. Leave a couple of inches a part because cookies will spread a little bit. Bake for 8 minutes, sprinkle a little kosher salt onto each cookie, rotate cookie sheets and bake for another 8 minutes.
Remove from oven and cool on sheets for 5 minutes until transferring them to a wire rack. Cool completely. Cookies will keep in an airtight container for about 1 week.
This is one of our views from our flat in De Pijp neighborhood in Amsterdam.
Breaking my vegan diet with hazelnut yogurt and a chocolate covered gingerbread man cookie for breakfast.
Happy Holidays!!!
Leftover pumpkin puree, fresh cranberries, plus a few pantry staples can easily be mixed and baked into something yummy. I don't mind having Thanksgiving leftovers of these two fall super star ingredients, because I can turn them into a delicious breakfast or afternoon treat.
I'm still on my vegan train, so I searched for the best vegan pumpkin muffin recipe to make. I found a recipe from PPK which after a little personal taste tweaking, these muffins were so tasty that I've almost convinced a few more people to be vegan. Almost.
If you're not a fan of cranberries or walnuts, just leave them pumpkin. I added cranberries to my recipe and they gave a little surprise burst of tartness in almost every bite. I also threw in some chopped walnuts because something crunchy is always good in my book.
Vegan Pumpkin Cranberry Walnut Muffins
slightly adapted from the recipe on PPK's blog
make 12 muffins
1 cup all-pupose flour
3/4 cup whole wheat pastry flour ***Or all-purpose flour***
1 tablespoon baking powder
1/4 teaspoon kosher salt
1 teaspoon cinnamon
1/2 teaspoon nutmeg***Freshly grated if you can.***
1/4 teaspoon ground ginger
1/8 teaspoon all spice
pinch of ground cloves
1 cup pumpkin puree
3/4 cup dark brown sugar ***Light brown sugar is OK too.***
1/2 cup soy milk
1/2 cup vegetable oil
2 tablespoons molasses
1 teaspoon vanilla extract
1 cup fresh cranberries - reserved 12 berries for the top of the muffins
1/2 cup walnuts - roughly chopped - reserve 2 tablespoons to sprinkle on top
Preheat oven to 400ºF. Line a muffin tin with cupcake liners and set aside.
In a large bowl, whisk together flour/s, baking powder, kosher salt and all of the spices. In another bowl, whisk together pumpkin puree and dark brown sugar. Add the soy milk, vegetable oil, molasses and vanilla. Mix thoroughly to combine.
Add the wet mixture to the dry mixture and gently fold together. Try not to over mix/fold your batter because it will overwork the glutens in the flour and your muffins will be tough. Stop mixing/folding a little before all of the ingredients are incorporated. Toss in your cranberries and walnuts and gently fold into your batter.
With a large scoop, divide batter into your lined muffin tin. Top each muffin with your reserved cranberries and sprinkle with reserved walnuts.
Bake for 20 minutes or until a toothpick/tester comes out clean. Cool on wire rack for 5 minutes before removing them from the muffin tin. Cool completely on wire rack or devour when still warm.
I haven't fallen off my vegan wagon but I've been wanting to post about this childhood favorite since the World Series. Up until about 3 weeks ago, I would whip up a batch of this peanut-caramel corn (aka Cracker Jacks) almost every weekend. Sadly I am on a dairy hiatus and I did make a fresh batch yesterday, but none of it was for me.
I discovered this recipe for homemade Cracker Jacks on Brown Eyed Baker's blog. I followed the recipe straight forward the first couple of times I made it, and then sometimes I used dark brown sugar instead of light brown, and kosher salt in place of regular salt. You'll need a candy thermometer to make the caramel and some patience while you wait for the caramel corn to cool. This recipe makes up to 10 cups of peanut-caramel corn which makes a great homemade Christmas gift or two.
Peanut-Caramel Corn (aka Cracker Jacks)
thank you BROWN eyed BAKER
makes up to 10 cups
***Brown Eyed Baker has a foolproof recipe for popping popcorn. Although you can easily use microwave popcorn but honestly her method for popping corn is so easy. Trust me.***
INGREDIENTS
10 cups of freshly popped popcorn - stovetop or microwave
1 cup light brown sugar ***dark brown sugar is OK too!***
1/4 cup light corn syrup
6 tablespoons unsalted butter, melted
2 tablespoons water
1/4 teaspoon salt
2 teaspoons vanilla extract
1/2 teaspoon baking soda
1 cup lightly salted & roasted peanuts
a candy thermometer
Preheat oven to 250ºF. Line 2 rimmed baking sheets with parchment paper and set aside. ***I prefer using a Silpat mat here. But parchment works fine too.***
Pop the corn. Coat a large mixing bowl with nonstick cooking spray and transfer the popcorn to the bowl and set aside.
In a saucepan, mix together the brown sugar, corn syrup, butter, salt and water and bring to a simmer over medium-high heat. Continue to simmer, stirring often (I use the candy thermometer to stir), until the mixture reaches 250ºF on a candy thermometer, about 3 - 5 minutes. ***Time will always vary depending on how high your heat is and how accurate your thermometer is. Sometimes it took my caramel 7+ minutes to reach the desired temp.***
Turn off heat and mix in the vanilla and baking soda. ***Again I just mix with the candy thermometer.*** The caramel is HOT and it will bubble like crazy when you're mixing in the vanilla extract and baking soda. Don't be scared and BE CAREFUL!!!
Immediately pour the hot mixture over the popcorn. Using a rubber spatula, gently fold the caramel into the popcorn until all of the popcorn is coated. Gently stir in the peanuts and divide the mixture to the prepared baking sheets, spreading it out evenly. ***You can also use 1 baking sheet here, but I found that dividing the mixture into 2 sheets resulted in a crispier caramel corn.***
Bake for 1 hour, stirring every 20 minutes. Remove from the oven and cool on a wire rack for 20 minutes or until completely cool. Gently break up the popcorn. Serve immediately, or store in an airtight container for up to 5 - 7 days.
I'm on week 3 with my vegan diet and I'm kind of getting used to this no-dairy thing. Although I'm not gonna lie, I miss butter!!! And I miss cheese!!! I'm not going to totally convert to being a vegan, but after my 2 month stint is over, I will go back to eating butter and cheese in moderation. But for now, I will continue to search and test some vegan recipes to satisfy my sweet tooth and midnight munchie attacks.
I try and find vegan recipes that I don't have to rush out to buy other ingredients. I was stoked to come across these vegan Mexican hot chocolate snickerdoodles by Post Punk Kitchen and when shared with my non-vegan friends, they couldn't even taste the lack of butter or eggs in them.
I didn't have any cayenne pepper so I substituted chili powder instead. I also made a few of my own adaptations to the original recipe.
Spicy Vegan Mexican Hot Chocolate Snickerdoodles
slightly adapted from Post Punk Kitchen
makes 2 dozen cookies
For the sugary coating:
2 tablespoons sugar
1/2 teaspoon cinnamon
INGREDIENTS
1/2 cup canola oil ***or veg oil***
1/4 cup sugar
1/2 cup brown sugar
3 tablespoons soy milk ***almond milk is OK here too!***
2 teaspoons vanilla extract
1 cup all-purpose flour
2/3 cup whole wheat pastry flour ***or all-purpose flour***
1/2 cup cocoa powder
1 teaspoon baking soda
1/4 teaspoon salt
1/2 teaspoon cinnamon
1/4 teaspoon chili powder (or 1/2 teaspoon cayenne)
Preheat oven to 350ºF. Line 2 cookie sheets with parchment paper. Set aside. In a shallow bowl or plate, mix together the 2 tablespoons of sugar and cinnamon.
In a medium bowl, sift together flour/s, cocoa powder, baking soda, salt, cinnamon and chili powder/cayenne. In a large bowl, whisk together oil, sugar/s, soy milk and vanilla extract. Gradually add the dry ingredients to the wet ingredients, stirring constantly until it forms into cookie dough.
With a 1-1/2 inch diameter cookie scoop, divide the dough into 24 pieces. Roll into walnut-sized balls and gently press into the sugar & cinnamon mixture, flattening roughly into 2-inch disks.
Sugarcoated side up, lay cookies onto your parchment lined sheets approximately 2 inches apart. Bake for 10 - 14 minutes. Cookies will have spread and will have crackly tops. Remove from the oven and cool 5 minutes before transferring to a wire rack. Store cookies in an airtight container for up to 5 days.
My doctor has presented me with a health challenge and I'm testing out a vegan diet for a couple of months. I'm already a vegetarian so giving up meat is not an issue. But no butter? No milk/cream? No cheese? Probably one of the worst times of the year to quit eating dairy with Thanksgiving & Christmas on the horizon. Anyway, I'm on week two and I'm not gonna lie, it's challenging. Tofutti products, soy/almond/oat milks and non-dairy based butters fill my frig now. Thank goodness that "some" dark chocolate is vegan. I've got to have something!
These vegan blueberry muffins look and kind of taste like regular blueberry muffins. They are missing the taste of buttery-goodness, but if you're allergic to dairy or like me testing out a vegan diet, give these a try. I especially liked them warm out of the oven and slathered with fake butter spread. Yum!
Vegan Blueberry Muffins
slightly adapted from Madhuram's Eggless Cooking
makes 9 muffins
INGREDIENTS
2 cup all-purpose flour
1-1/2 teaspoons baking soda
1/2 teaspoon salt
zest of a lemon
3/4 cup sugar
1 cup soy milk ***Soy milk worked best for me. Almond milk resulted in dense, and not as fluffy muffins.***
1/3 cup canola oil
1 teaspoon vanilla extract
1 tablespoon apple cider vinegar
1-1/2 cups blueberries - fresh or frozen
Preheat your oven to 375ºF. Spray a muffin tin with cooking spray or line with paper liners. Set aside.
In a large bowl, sift together flour, baking soda, salt and lemon zest. In another bowl, whisk together sugar, soy milk, oil, vanilla extract and vinegar. Add the wet ingredients to the dry ingredients and with a spatula gently fold/mix together. Try not to over mix. Add the blueberries and gently fold them into the batter.
With a large scoop, divide batter into the prepared muffin tin. ***I was able to get 9 muffins.*** Bake for 18 - 22 minutes.
The muffins will be golden brown on top. You can also insert a tooth pick into a muffin and when it comes out clean, they're done. Cool on a wire rack for 5 minutes before removing them from the muffin tin.
Fall is one of my most favorite times of the year. Especially now when the leaves are changing color and the weather drops into baking weather. It's also apple season and while I love eating apples as they are, I also love turning them into pie, compote for ice cream, mixing them into spice muffins and when I'm looking for a quick dessert, this simple apple tart.
INGREDIENTS
2 Granny Smith apples - peeled, cored & sliced into 1/4" slices
1 sheet of puff pastry - thawed
1 tablespoon unsalted butter - cut into 1/4" tiny cubes
1 tablespoon sugar
2 tablespoons apricot jam
Preheat your oven to 400ºF. Line a baking sheet with parchment paper and set aside. Peel and core your apples.
To keep your apples from turning brown, drape a damp paper towel over them as you slice apples.
With a sharp knife, slice apples into 1/4" slices.
Remove your thawed puff pastry from the frig and carefully unfold onto your prepared baking sheet.
I like to create an edge on my tarts. With the tip of a paring knife, draw a 1/4" frame inside your puff pastry.
Start laying down your apples slices within the framed edge; slightly overlapping each other.
Continue with the rest of your apple slices until the puff pastry is covered. Dot the top of the apples with the cubed butter and sprinkle generously with sugar.
Bake the tart for 40 - 45 minutes. The edges of the tart will be quite brown. Remove from oven and cool on wire rack. Once the tart is cooled, warm the apricot jam with 2 teaspoons of water to make a glaze. ***I just place it in a ramekin and nuke for 20-30 seconds.*** With a pastry brush, gently brush/dab the warmed apricot glaze over the apples and edges of the tart. ***Careful not to brush too hard or else you'll disturb your apples.***
The apricot glaze gives a little sweetness to the tart and makes it look all shiny and delicious.
Not just for dessert.....make this apple tart for breakfast!!!