Showing posts with label jam. Show all posts

Tuesday, February 14, 2012

raspberry zinger cupcakes & happy valentine's day!!!

Almost one year ago I blogged about raspberry zinger cupcakes. I didn't include any real recipes or techniques. I gave a small and lame description and I attached a little photo. But for some weird reason, this was and still is THE most popular post!!! 
I guess everybody loves Zingers.....


I hope the second posting of this "recipe" gets as many hits as the original post. I tried to photograph every single step so that anyone and everyone could follow. The creamy white filling still seems like a mystery to me, but I borrowed a recipe for the filling from another blog for today. After I sampled my zinger cupcakes, I think plain old marshmallow Fluff will do just fine.....


Classic White Cake
Makes 24 regular-sized cupcakes OR half the recipe and make 12
This recipe was given to me by one of my pastry chef instructors from The French Culinary Institute. It was a xerox copy of a page from either a book or magazine. Unfortunately it didn't have any names attached so that I cannot give credit to where it is due.


1 cup milk - at room temperature
3/4 cup egg whites (about 6 large or 5 extra large) - at room temperature
2 teaspoons almond extract
1 teaspoon vanilla extract
***If you don't have almond extract, you can just substitute it for more vanilla extract***
2 1/4 cups plain cake flour (NOT self-rising)
1 3/4 cups sugar
4 teaspoons baking powder
1 teaspoon salt
12 tablespoons unsalted butter - at room temperature


Heat oven to 350˚F. Line a cupcake/muffin tin with paper liners. Set aside.


Pour milk, egg whites, and extracts into a measuring cup and mix with a fork until blended.


Mix cake flour, sugar, baking powder, and salt in a bowl of an electric mixer at low speed. Add butter; continue beating at low speed until the mixture resembles moist crumbs, with no powdery ingredients remaining.


Add all but 1/2 cup of milk mixture to crumbs and beat at medium speed (or high if using a handheld mixer) for 1 1/2 minutes. Add remaining 1/2 cup milk mixture and beat for 30 seconds more. Stop mixer and scrape down sides of bowl. Return mixer to medium (or high) speed and beat for 20 seconds longer.


Divide batter evenly in your cupcake liners. ***I use a 2 ounce scoop.***


Bake on the middle rack for 20 - 25 minutes or until toothpick inserted in the middle comes out clean. Rotate pan for even baking and browning. Cool completely on wire rack.


Creamy White Filling
Makes enough to fill 24 cupcakes


6 tablespoons unsalted butter, softened
1 1/2 cups confectioners' sugar
3/4 cup marshmallow Fluff
1 1/2 tablespoon heavy cream


In a medium bowl beat together the butter and marshmallow Fluff. Add confectioners' sugar and heavy cream. Mix slowly until combined then beat until fluffy. 


***In a pinch, you can use the marshmallow Fluff straight from the jar.***


Transfer mixture into a Ziplock bag or pastry bag fitted with a 1/2-inch round tip.
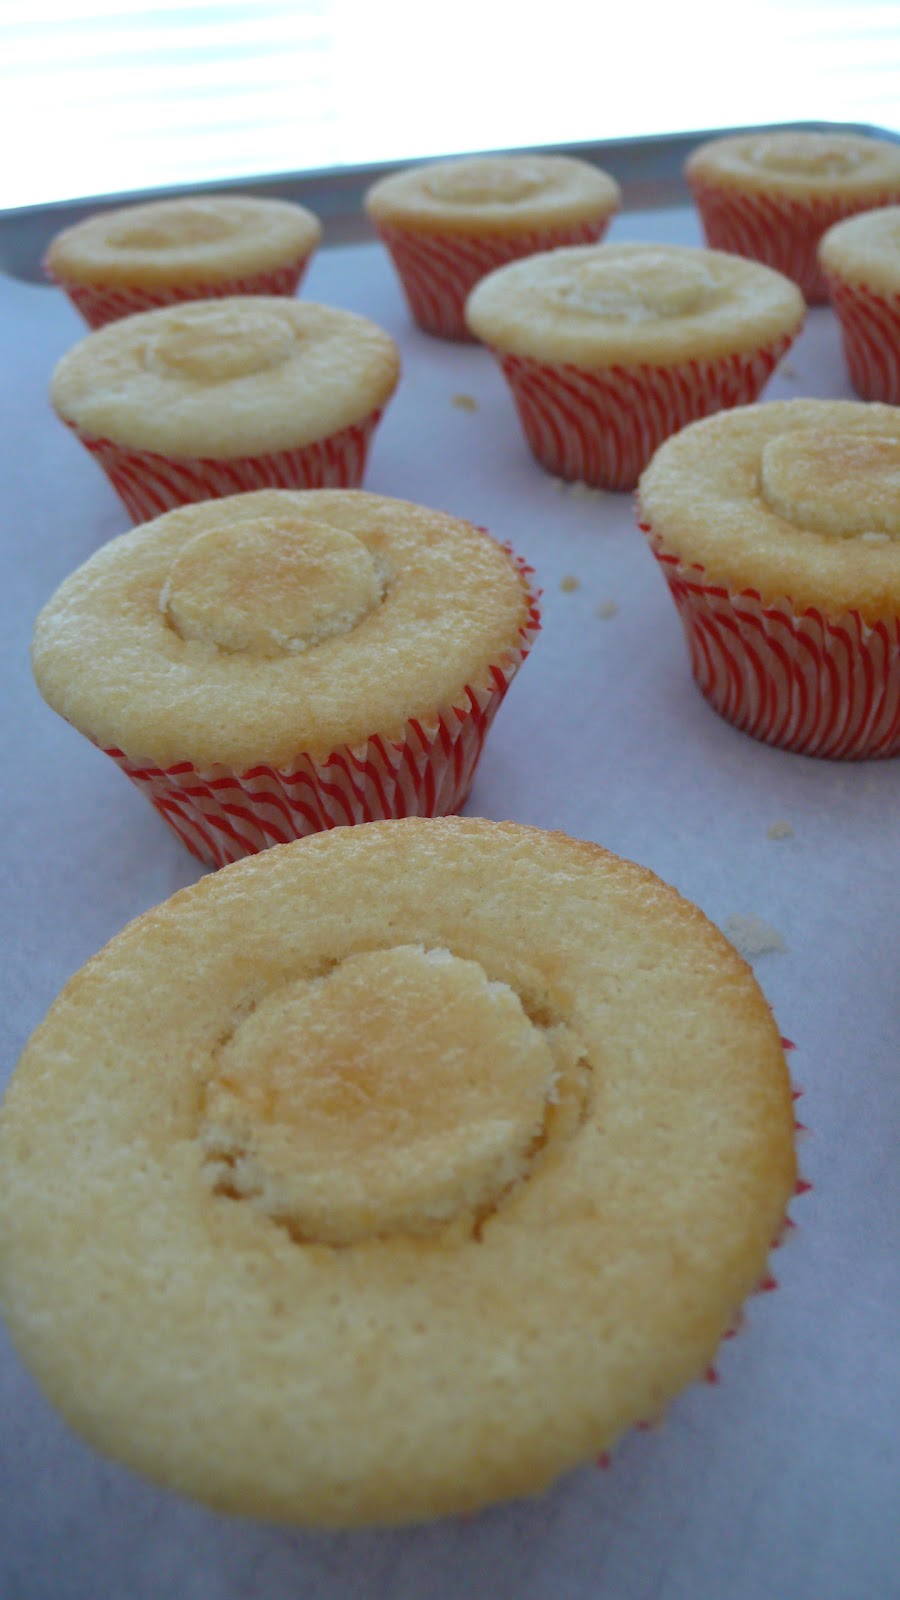
In the meantime, with a 1-inch round cutter, cut the middles out of the cooled cupcakes. 


Since you will be filling these, cut a little off of the bottom of each cupcake "middles".


Set the cupcakes and "middles" aside while you strain the seeds from the raspberry jam.


In a strainer over a small bowl, with a small spatula, gently press the 1/2 cup raspberry jam through the strainer to remove the seeds. Set aside.


Cut a small hole off of the tip of your Ziplock bag or insert the tip of your pastry bag into the hole of each cupcake and slightly squeeze in some filling.  


Fill about 3/4 full.


Place the reserved cupcake "middles" on top of the filling and press down slightly. Refrigerate to set for 5 minutes.


Get a small offset spatula or butter knife, your strained raspberry jam and in a small shallow dish 1/2 cup unsweetened coconut ready.


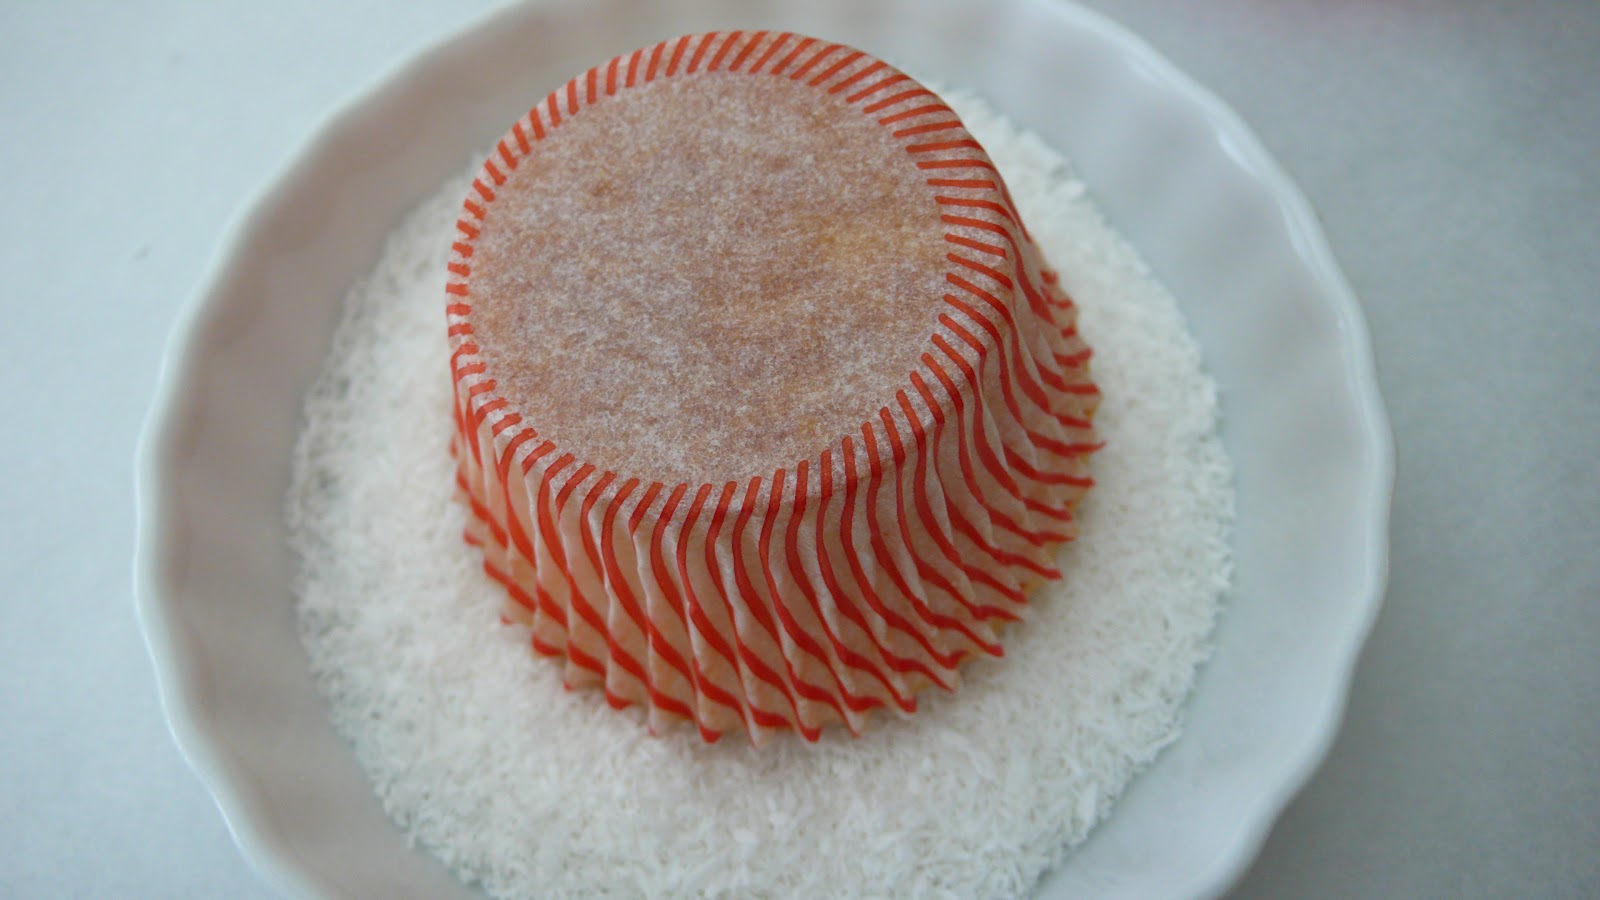
Spread a thin layer of jam over the tops of each cupcake.


Then carefully dredge each one in unsweetened coconut.


HAPPY VALENTINE'S DAY!!!

Friday, December 30, 2011

peanut butter-n-jelly bars and a happy new year!!!

It's New Year's Eve Eve and it's time to bust out your resolutions. A lot of people have dieting on their lists, but before you start your New Year's diet, go into your kitchen and make these. Now! 

When I was tasting them earlier I was kinda convincing myself that these would be a great breakfast item. Yeah, right?! These peanut butter-n-jelly bars are just wrong.....but in a good way.

Peanut Butter-n-Jelly Bars
2001 Holiday Cookie Issue by Martha Stewart

Makes about 3 dozen

1/2 pound (2 sticks) unsalted butter @ room temperature, plus more for pan
1 1/2 cups sugar
2 1/2 cups smooth peanut butter ***Other recipes called for Skippy, but I went with a natural and organic peanut butter***
1 teaspoon vanilla extract
2 large eggs @ room temperature
3 cups all-purpose flour, plus more for pan
1 1/2 teaspoons table salt ***I used kosher salt***
1 teaspoon baking powder

1 1/2 cups strawberry jam ***I like raspberry***
1 cup salted peanuts, roughly chopped 

1. Preheat oven to 350˚F. Butter a 9-by-13-inch baking pan, and line the bottom with parchment paper. Butter the parchment paper, dust with flour, and tap out the excess; set aside. Place butter and sugar in the bowl of an electric mixer fitted with paddle attachment. Beat on medium speed until fluffy, about 2 minutes. Add peanut butter and vanilla and mix to combine. Add eggs one at a time; incorporating each egg until it's creamy and a homogeneous mixture, about 2 minutes.


2. Whisk together flour, salt and baking powder. Add to the butter mixture, and beat on low speed until combined. Transfer two-thirds of the mixture to your prepared pan. Press down dough evenly with your fingers or an offset spatula. Using your offset spatula, spread 1 cup of jam on top peanut butter mixture. With the remaining third of dough, drop small clumps/dollops of peanut butter dough on top of jam. Sometimes the jam is completely covered by the third of the peanut butter dough. Not to worry, here is where you would dollop the remainder 1/2 cup of jam in tablespoons on top of the peanut butter clumps. Sprinkle with chopped salted peanuts.


3. Bake until golden, 45 to 60 minutes, rotating halfway through. Transfer to a wire rack to cool. Run a knife around the edges and refrigerate, 1 to 2 hours. Cut into about thirty-six 1 1/2-by-2-inch pieces.


For Chris, Sarah, Eddie & Marilyn.....Happy New Year!!!

Sunday, October 2, 2011

brioche & bostock

It's October and it's finally feeling like Fall here on the East Coast. Aaahhhhh.....64 degrees.....I've been longing for the weather to be in the sixties. I absolutely love Fall because the weather calls for hot tea drinking and pastry eating and today was no exception. 


I've been also longing for almond brioche toast and chai tea. Not the most classic combination of flavors or cultures, but sounding all good in my book and soon to be in our tummies. 


Ta da!!! 
My brioche!!! 
I have to admit, I have only made a loaf of brioche bread - once. 
In pastry school. 
Over five years ago. 
When you think of baking bread, especially a loaf of brioche, your head starts to hurt. Well at least mine did, but I sucked it up and broke out my enormous Pasty 1 Cookbook from my days at The French Culinary Institute and had at it. As I was making the brioche dough, I was wondering what and why I was so stressed out about making it. The mixer did all of the work!!! I just had to measure out the ingredients and dump them in the bowl at certain times. No. Big. Deal. So here's the recipe I used with some modifications because I didn't have on hand fresh yeast. Who does, really?


Brioche 
makes one 8 1/2 x 4 1/2 inch loaf or 20-25 individual brioches à tête


500 grams bread flour
70 grams granulated sugar
30 grams fresh yeast or 10 grams dry yeast
50 milliliters water (warm-ish)
5 eggs (preferably large eggs)
2 teaspoons salt (I used kosher salt) 
250 grams unsalted butter, cold and cubed


1 egg
1 tablespoon of heavy cream


1. Put the flour and sugar in a bowl of your tabletop mixer and dry mix using the paddle attachment.
2. Dissolve the yeast in the water. ***If you're using dry yeast, proof in the water for 3-5 minutes until foamy*** Add to dry ingredients.
3. Add eggs to the mixture one @ a time and combine. 
4. Switch to a dough hook.
5. At a low to medium speed, work the dough until it's smooth and satiny. You will need to scrape off the dough hook several times during mixing/kneading. The final dough should completely come away from the sides of the bowl and have a smooth texture.
6. Add the cold butter and incorporate each piece thoroughly, or the pieces of butter will melt during baking, creating a void in the dough. If the butter begins to melt out of the dough while mixing, add a small amount of additional cold butter to bring it back together.
7. Add salt and mix in thoroughly.
8. Shape the dough into a ball, wrap it well in plastic wrap and chill it for a minimum of 4 hours. ***I chilled mine overnight*** 
9. Preheat oven to 350F degrees.
10. Prepare individual molds or loaf pan by coating the sides and bottom with a fair amount of butter.
11. Shape dough by gently flattening it out and rolling it up like a jelly roll, pinching the end onto itself. Tuck in the sides and place into your prepared pan/s.
12. Proof dough by placing it into your cold oven with a pot of water that has come to a boil or in a warm area. Proof for at least 1 hour.
13. In a small bowl, whisk together egg and heavy cream. Gently brush over proofed dough.
14. Bake until bread is medium to dark brown or until internal temperature reads 160-200 with an instant thermometer.
15. Cool on wire rack for 10 minutes and then remove from pan/s and cool completely.


Bostock
Bostock? Yes, I have never heard of almond brioche toast being called bostock either.....But in my quest to find the ultimate recipe for brioche topped with almond cream and toasted almonds I found many recipes on the web as well as on my shelf from my TARTINE BREAD cookbook.


Their recipe called for brushing the bread with an orange simple syrup, but I didn't have any oranges and I felt that since my bread was baked fresh that I didn't need to. But I did have vanilla syrup in my frig and I used that instead. I was also intrigued by their version because they smeared their brioche with jam before covering it up with almond cream. Shall I go on???


Almond Cream
1 1/4 cups sliced almonds
1/2 cup granulated sugar
pinch of salt
2 large eggs
1/2 cup (1 stick) unsalted butter
2 tablespoons of brandy 
***I didn't have any brandy on hand, so I added 1/2 teaspoon of pure almond extract***


Orange Syrup
1/4 cup water
1/4 cup granulated sugar
1 teaspoon orange blossom water
1/4 cup orange juice
grated zest of 1 orange
2 tablespoons of orange liqueur
***If you are attempting this and you don't have orange blossom water or orange liqueur (not your usual pantry staples), simply omit it***


Bostock
6 slices of brioche, each about 1/2 inch thick and toasted
3/4 cup orange marmalade, apricot jam, or berry jam
powdered sugar for dusting


To make the orange syrup, in a small saucepan, combine the water, sugar, orange blossom water, orange juice and zest. Bring to simmer over medium-high heat, stirring constantly. When the sugar has dissolved, after about 5 minutes, remove from heat. Stir in the orange liqueur. Let cool to room temperature.


To make the almond cream, combine 1 cup of the sliced almonds, sugar and salt in a food processor and process until finely ground. Add eggs and butter and process to form a paste. Transfer to a bowl and stir in the brandy. Cover and refrigerate for at least 1 hour or up to 3 days.


Preheat the oven to 400F degrees. Arrange the brioche toasts on a baking sheet. Using a pastry brush, thoroughly soak the toasts with the syrup until they are very moist. Spread with a layer of jam about 1/8 inch thick and follow with a layer of almond cream about 1/4 inch thick. Top with remaining 1/4 cup sliced almonds. Bake until deep golden brown, 15 to 20 minutes. The almond cream will caramelize, and the almond slices will toast. Dust with powdered sugar before serving.  


***I went a little light on the jam and almond cream and didn't really soak my bread in a lot of syrup. My bostock still tasted great!!!***

Friday, May 13, 2011

PB & J Bon Bons

I have been traveling like a mad-woman these days and have been experiencing some amazing food on my trips. If you're a friend of mine on Facebook, you've probably heard of all the deliciousness Seattle, WA had to offer. I had and have to brag because Seattle is at the top of my list of "best places to chow down". This rainy city has a different vibe and approach to cooking, but hands down, they can compete with some of the best places here in Manhattan.


I am still savoring one particular dish (it was an appetizer), PB & J Bon Bons, from Local 360 in the neighborhood of Belltown. OMG, these were scrumdiddlyumptious!!!


I feel challenged to recreate these delicious gems. But since I'll be boarding a plane again soon, they'll just have to wait until I'm back on this continent.


For now, you and I can only dream of these.....But if anyone feels inspired, here is what I got out of eating a plate bon bons and a few hints from our server:


PB & J Bon Bons
- frozen ball of organic & natural peanut butter
- wrapped in brioche dough
- rolled in Panko bread crumbs
- deep fried until they were golden brown
- served warm on top of homemade organic blackberry jam
- with a shooter of organic milk


Friday, April 29, 2011

no bake cheesecake

So I've just returned from Ottawa, Canada (for work not play) and before I left my hubby for a few days, I made him his most favorite dessert. AND since I'm feeling a bit peckish and there's a tiny piece left in the frig I'll have to munch it down to give me some energy to get through the rest of the afternoon.....


In a pinch the Jello-O brand cheesecake is just OK......THIS no bake cheesecake is more than OK, it's deeeeeelicious!!!


I'm a food tv junkie, food blog stalker and a life-long subscriber to many food related mags. I LOVE FOOD!!! And I particularly LOVE "fresh, quick and simple" recipes. I know I've posted about a few semi-difficult ones, but I just LOVE the simplicity of some of Nigella Lawson's dishes that this one I just had to share. She is the ultimate "queen of food porn". Not to mention she's pretty gorgeous too......She is neither a trained chef nor cook but a food writer and journalist and can write and describe food as if you're actually sitting down and eating it. So let's hear it.....


No Bake Cheesecake
via Nigella's website


***In honor of the Will & Kate's Royal Wedding today, please read the following with your best British accent***


This is not the trad baked cheesecake that requires patience and lots of spare time. No, this is fresh, quick, simple and - best of all - irresistibly scrumptious!


Even in the spirit of retro-accuracy, please do not be tempted to open up a jar of cherry pie filling over the cake. I use some French cherry concoction that seems to be pretty universally available and has no added sugar, but anything labeled "conserve" as opposed to "jam" should be safe. And, if you feel like it, when cherries are in season, strew the top with a couple of handfuls of beautiful fruit.  


Serves 6 - 8
INGREDIENTS
125 grams digestive biscuits OR 1/3 of a box of graham crackers (1 package of 9 whole crackers)
75 grams soft unsalted butter OR 3/4 stick (6 tablespoons) soft unsalted butter
300 grams cream cheese OR 10 ounces cream cheese
60 grams icing sugar OR 1/2 cup powdered sugar
1 teaspoon vanilla extract 
1/2 teaspoon lemon juice
250 milliliters double cream OR 1 cup heavy cream


1 - 284 grams jar of St. Dalfour Rhapsodie de Fruit Black Cherry Spread ***As I said earlier, blueberry cheesecake is my husband's favorite dessert, so I make a blueberry topping instead***See below for recipe***


METHOD 
Blitz the biscuits/graham crackers with a pinch of salt in a food processor until beginning to turn to crumbs, then add the butter and whiz again to make the mixture clump.


Press this mixture into a 20cm (8-inch) spring-form tin; press a little up the sides to form a slight edge.


Beat together the cream cheese, icing sugar (powdered sugar), vanilla extract and lemon juice in a bowl until smooth.


Lightly whip the double cream (heavy cream), and then fold it into the cream cheese mixture,


Spoon the cheesecake filling on top of the biscuit (graham) base and smooth with a spatula. Put in the fridge for 3 hours or overnight.


When you are ready to serve the cheesecake, release it from it's pan and spread the black cherry jam over the top.


Blueberry compote
3 cups blueberries - fresh or frozen
3/4 cup sugar
2 tablespoons unsalted butter
2 tablespoons lemon juice
1 tablespoon cornstarch
pinch of cinnamon
pinch of salt
1/2 teaspoon vanilla extract


Over medium-high heat, combine all of the ingredients and bring to a simmer, 4 minutes. Remove from heat and add vanilla. Cool and refrigerate.


Monday, March 14, 2011

peanut butter & jelly macarons from bouchon bakery


I wish I made them.
I only ate them.


This French favorite with an American twist was just way too delicious not to blog about. New Yorkers I want you to drop everything and head to BOUCHON BAKERY as fast as you can!!! These cookies are dang good!!!!!

Saturday, March 12, 2011

raspberry zinger cupcakes

Hey there!!! I've updated this blog post!!! For a white vanilla cake recipe and step-by-step tutorial on how I make Raspberry Zinger Cupcakes, follow the link by clicking here.  


Raspberry Zingers......Do you remember eating these as a kid???


I don't have an early childhood memory of eating these at home maybe because things like Raspberry Zingers were not something my parents bought us for treats or snacks. Although I do have a memory of walking home from St. Pius X and stopping into the neighborhood 7-Eleven after school to snag up a 4-packet of these coconut sprinkled gems. Yes, I went to a Catholic school, wore a plaid uniform and I would have easily gone into 7-Eleven before school to add these to my bagged lunch but that was a no-no back in the day. You were spotted for miles in your plaid skirts and white shirts that store owners and concerned neighbors happily squealed on you. 


Whenever I bake cupcakes for an order, there are somehow at least a half a dozen or more than I actually need. And since my husband isn't a fan of "cupcakes" I think of different ways to dress them so that we both can enjoy them. Because let's face it.....I design cakes and cupcakes and of course I EAT THEM!!! 


This blog post will not have a real recipe attached to it, but steps on how you can relive this tasty treat.
for Raspberry Zinger Cupcakes
- vanilla cupcakes (from scratch or not)
- raspberry jam (seeded)
- vanilla buttercream or marshmallow fluff
- dried, unsweetened coconut


Once your vanilla cupcakes are completely cooled, cut out the center and set it aside. I use a 1-inch round cookie cutter but if you've got some good knife skillz, you can cut it out with a paring knife. I then fill it with my desired buttercream or fluff and place the piece of cake on top. Remove the seeds from the raspberry jam by smooshing it through strainer. Spoon a little on top of each cupcake and spread it smoothly. Sprinkle the entire top with the dried coconut and voila!


Raspberry Zinger Cupcakes!!!!